Part 1: Gun Basics
Recently I've been playing around with GunDB and I wanted to
share with you what I've learned so far. GunDB, a.k.a Gun, a.k.a Gun.js, is more
than just a graph database. It's a group of projects that aims to simplify
scaling, improve data security, save costs, and empower application developers.
In this article however, I'll explore Gun exclusively as a database. By focusing
only on the database aspect I can keep the article less overwhelming and explore
other aspects in the upcoming articles as I make progress and learn more.
All the code examples for this article are available on
Gitlab
Introduction
Generally speaking, a database is a piece of software that you install on your
computer or on a remote server to store data. The data can either be stored on
disk or in memory. Databases come in different flavors: relational,
document-oriented, key-value, or graph based. Here are some examples:
- Relational: MySql, PostgreSQL, SQL Server
- Document-oriented: MongoDB, CouchDB
- Key-value: Redis, LevelDB
- Graph based: Neo4j, OrientDB
Gun, unlike other databases, doesn't have a binary to install. Gun is written in
JavaScript, which means you can use it anywhere that JavaScript runs.
Getting started with Gun is as easy as downloading a JavaScrip file.
Getting Started
The simplest way to get started with Gun is by downloading it as a single
JavaScript file. You can download the latest minified version from the following
url:
https://rawgit.com/amark/gun/master/gun.min.js
Then you can load it in an Html file:
<!DOCTYPE html>
<html lang="en">
<head>
  <meta charset="UTF-8">
  <script src="gun.min.js"></script> <!-- import Gun -->
  <title>Gun Basics</title>
</head>
<body>
</body>
</html>
You can then open the Html file in the browser and use the console to interact
with Gun. In most browsers you can right click on the page and choose "Inspect
Element" to open the console. Below is an example than you can use to create a
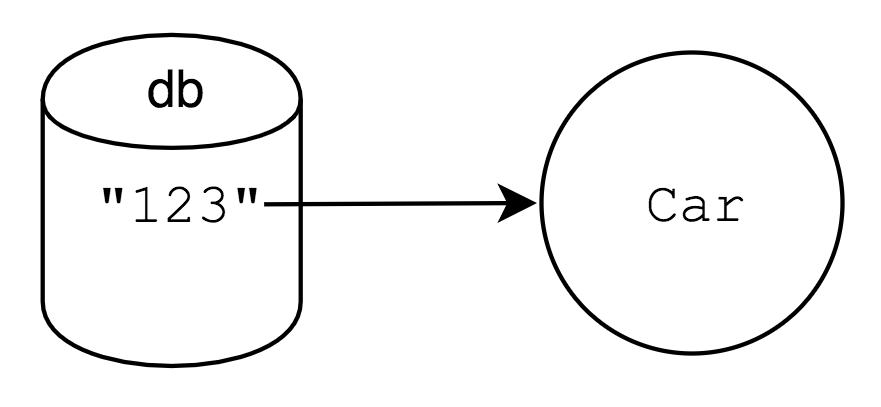
Car record and print its make:
const db = window.Gun();
const car = db.get("123").put({
  make: "Toyota",
  model: "Camry",
});
car.once(v => console.log(v.make)); // --> Toyota
In the snippet above, first, we create an instance of Gun. Then, we reference an
empty node using the get method with the 123 key. Next, we add some data
using the put method and a plain JavaScript object. And finally, we use the
same key to get hold of the record (node) and using the once method we read
the value out. Note that the plain object is automatically converted to a Gun
node. I'll explain each method in more detail later in the "Basics" section.
Below is a digram to help you better understand what's going on:
Now let's experiment with Gun using Node. First, create a directory and install
Gun using npm:
If you don't have Node and npm installed, you can take a look at Appendix 1
for instructions.
cd ~/Desktop && mkdir gun-demo && cd $_
npm init -y
npm i gun -S
Next create a file and name it main.js and add the following (very similar to
above):
main.js
const db = require('gun')();
const car = db.get("123").put({
  make: "Toyota",
  model: "Camry",
});
car.once(v => console.log(v.make)); // --> Toyota
Then execute the file by node main and you should be able to see Toyota
logged in the console. Alternatively, you can use Gun in Node's REPL by first
calling node in the terminal and then running the following:
const db = require('gun')();
Then you you can interact with Gun using the db object. To close the REPL use
ctrl + c twice.
Gun Basics
In the following sections I'm going to show you the basics of Gun and explore
its fundamental methods for creating, reading, updating, and deleting records. I
will also show you how to create sets and relationships. I will also briefly
mention the different methods available for subscribing to records for updates.
Please note that I will use the term record and node interchangeably since Gun
is a graph database and records are represented as nodes.
CRUD
- Create
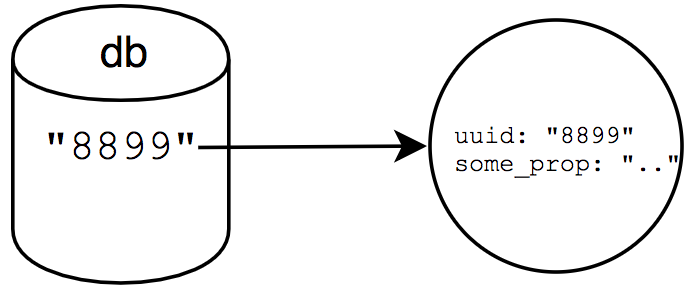
To create a record, you can use the get method combined with put:
const entry = db.get('8899').put({
  uuid: '8899',
  some_prop: 'some value',
});
In the snippet above, we use the get method to create a reference to a node
using the 8899 key. Then, we use put to add data to the node using a plain
JavaScript object. The plain object is automatically converted to a Gun node.
Note that if the given key already exist, the data added might override existing
data. I'll cover updates in more detail in the "Update" section. The diagram
below demonstrates how the given key in the database points to a node:
Quick note about keys: you should always use unique keys. You may want to use
uuids for generic nodes, and hashed strings combined with readable strings for
indexing purposes. Namespacing is very important when working with Gun, because
all data exist in the global space. You may want to look at this
extension to help you namespace your
keys.
- Read
We can use the get method to lookup a node given a key. We can then subscribe
to it using on or once. Using on you can get updates as they happen, but
once only emits the current value once:
const node = db.get("1122").once(v => console.log(v));
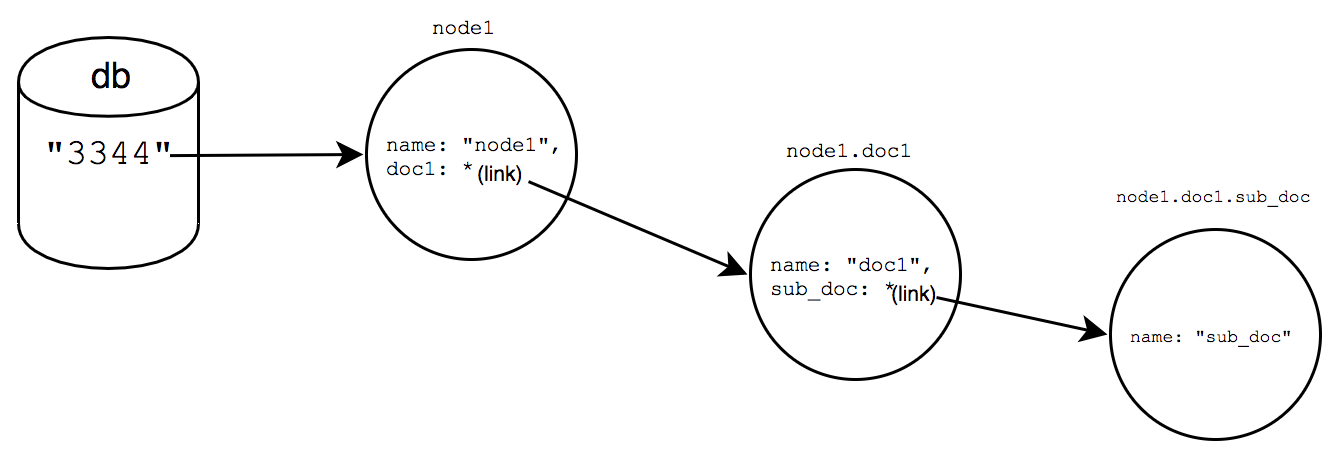
You can keep chaining get calls. If the references don't exist, they are
created. Otherwise, the value at the given path is returned. Let's take a look
at an example. Below we are creating a node called node1 with some properties:
const node1 = db.get("3344").put({
  name: "node1"
});
node1.get("doc1").put({
  name: "doc1",
});
node1.get("doc1").get("sub_doc").put({
  name: 'sub_doc',
});
For example, to access the value of node1.doc1.sub_doc we can use a get
chain and read the value using once:
node1.get('doc1').get('sub_doc').once(v => console.log(v));
The diagram below shows how the nodes and the relationships look like:
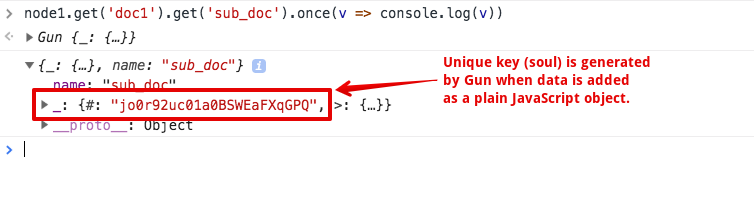
A few notes about the snippets above:
- When you use
put, if the key is not explicitly specified, a key (also known
as a soul) is automatically generated. In addition, thedbobject will save
a reference to that key as well. For example, when we did
node1.get("doc1").put, a new node with a unique key was generated behind the
scenes. We can see that if we log the value ofnode1.doc1and look at the
internal_property:

Now if you know this unique key (soul) of the node, you can directly access the
node it's pointing to from the db object:
db.get('unique_key')...
- The same is also true for
node1.doc1.sub_doc:
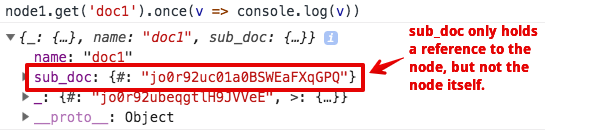
- Also note that,
node1.doc1has a property calledsub_docthat only holds a
reference to thesub_docnode:
Considering the explanations above, below is a more accurate picture of the
nodes and their relationships:
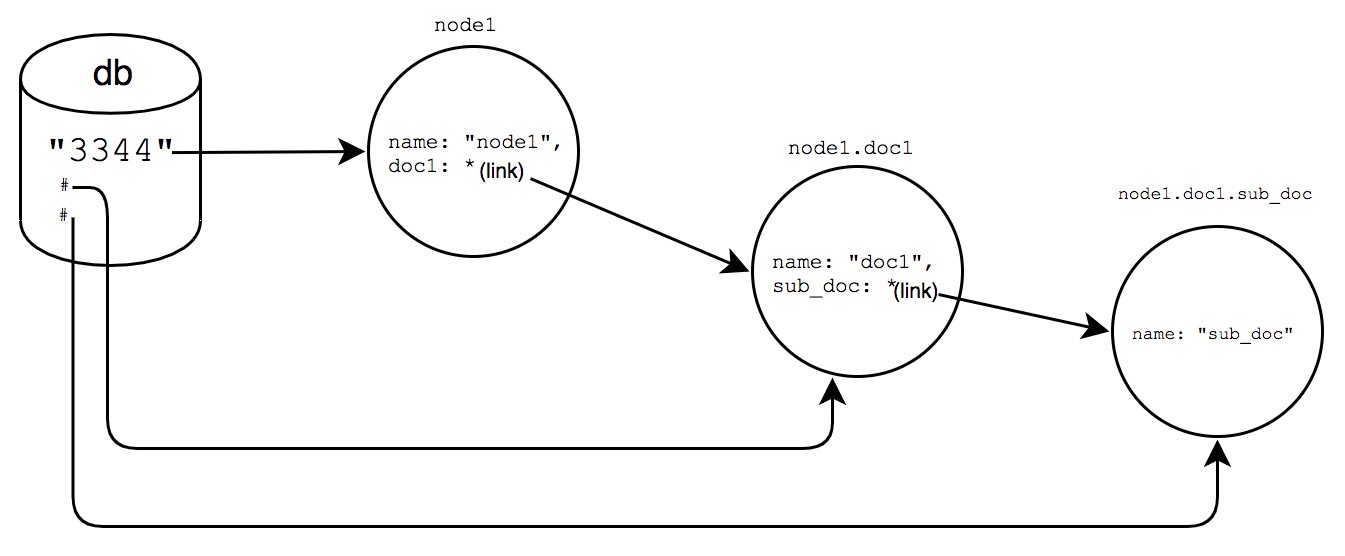
Note how the other two auto generated unique keys (souls) point to the newly
created nodes directly from db.
- Update
To update a record, you can use the put method:
db.get('9871').put({
  name: 'Tom',
});
Note that all the updates are partial updates. In the snippet above, only the
name field is updated. As long as you have a reference to the node, you can
simply use put to update values. Let's take a look at another example. Below
is the setup:
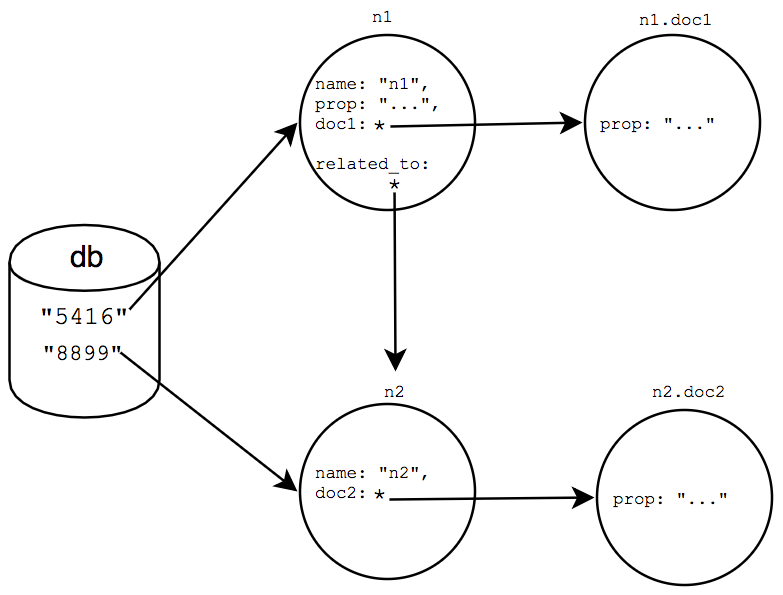
const n1 = db.get('5416')
  .put({
    name: 'n1',
    prop: '...',
    doc1: {
      prop: '...',
    },
  });

const n2 = db.get('8899')
  .put({
    name: 'n2',
    doc2: {
      prop: '...',
    }
  });

n1.get('related_to').put(n2);
In the snippet above we create two nodes: n1 and n2. The n1 node has some
properties name, prop, and doc1. The doc1 property
defines a sub document that is automatically turned into a node and referenced
by an auto-generated key.
Then we create the n2 node that has two properties name, and doc2 similar
to n1. And finally we create a property on n1 called related_to that
points to n2. The diagram below demonstrates the relationships:
Now let's see how we can perform the following updates:
- Update
n1.doc1.propto another value:
n1.get('doc1').put({
  prop: 'other value'
});
- Update what
n1is related to
n1.get('related_to').put(db.get('9185').put({ new_prop: 'some value', }));
In the snippet above we completely change what n1 is pointing to by creating a
new node. Note that n2 didn't change, we just updated the related_to
pointer.
- Add new properties to
n2, first by referencing fromn1:
n1.get('related_to').put({
  new_stuff: 'some value',
  other_stuff: 'some value',
})
In the snippet above, new_stuff and other_stuff will be added to what is
already existing on n2. If a property already exists, it will be overwritten,
otherwise new properties will be created.
- Delete
Deleting works a little bit differently in Gun. Instead of eliminating a record,
we can make it non-discoverable by setting a pointer to null:
db.get('8809').put(null);
In the snippet above we use get to find a reference by the 8809 key. Then,
we set it to null. As long as you have a reference to a node or property, you
can use put to set them to null. You can read more about deleting using the
following links:
Here is a brief explanation take directly from the StackOverflow answer:
Deletes in GUN work like Mac OSX or Windows or Linux. The nulling tells every
machine to "Put this data in the trash/recycle bin". The reason this is useful
is because it lets you change your mind about deleting something, so you can
recover it later if you want. (Recovering deleted content/files happens a LOT,
but it something most people don't think about).
Sets
Gun allows you to group multiple records and add them to a set. A Gun's set, is
a mathematical set with unique unordered items. Let's say we have two nodes, and
we want to create a group for then. First, we create the group node and then we
use the set method to add other nodes or plain objects to it. Note that the
plain objects, just like update operations, will be converted to Gun nodes
automatically:
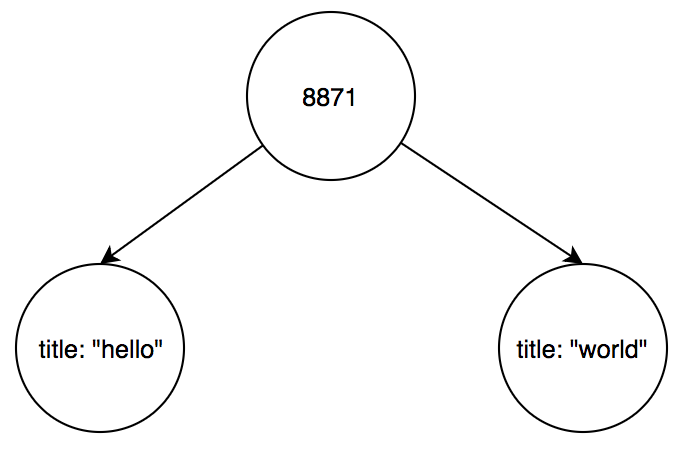
const group = db.get('8871'); // create a group node
group.set(n1);
group.set(n2);
Now group has two record, n1 and n2. You can also add plain objects to a
set:
const group = db.get('8871');
group.set({
  title: 'hello'
});
group.set({
  title: 'world'
});
In this case Gun will automatically create nodes from the plain objects. The
diagram below show the set and the nodes that it's pointing to:
Relationships
Modeling the real-world is all about identifying relationships and implementing
them in a database. Graph databases are naturally good at expressing
relationships. In this section I'm going to show you how to create relationships
between nodes.
The simplest way for creating a relationship, as we have seen before, is using
the following pattern:
node1.get('related_to').put(node2)
or explicitly creating a relationship while making a node:
const node1 = db.get('8891').put({
  uuid: '8891',
  name: 'node1',
  related_to: {
    uuid: '9911',
    name: 'node2',
  },
});
In the snippet above, related_to is turned into a node by Gun automatically and
the reference is stored in node1. You can then access the linked node with
node.get('related_to').
Now, if you want to add properties to a relationship, you can create an
intermediate node and add the properties of the relationship and the link inside
the intermediate node:
node1.get('related_to').put({
  property: "value",
  property2: "value",
});
node1.get('related_to').get('node').put(node2);
The diagram below demonstrates the relationships:
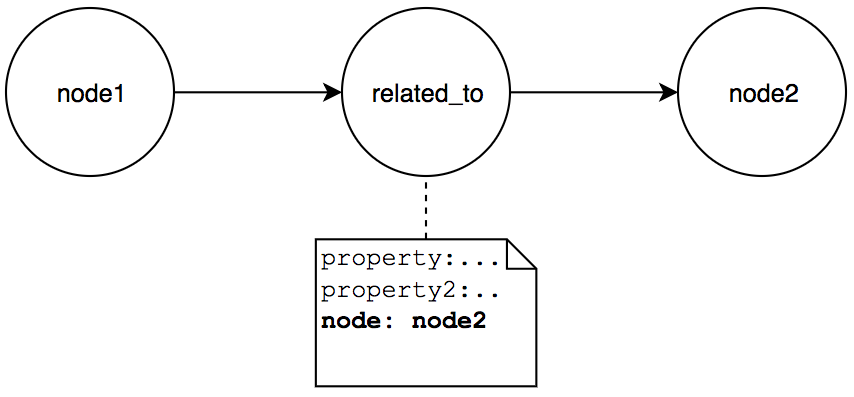
As you can see in the diagram above, the related_to node points to node2
through the node property of the intermediate node. You can then access
node2 with node1.get('relate_to').get('node').
Subscribing with on and once
Gun nodes are observables, which means that they emit values over time. You can
subscribe to Gun nodes using on or once. Using on you can get updates as
they happen unless you cancel your subscription. The once method only
retrieves the current value and doesn't subscribe for future updates.
Iterating Through Records
Given a set of records, you can iterate through them using map:
myset.map().once(v => console.log(v));
The snippet above will log each record in myset once. It will also get the
records added over time, but only once.
Here are more patterns that you can use (take directly from the documentation):
myset.map().on(cb): subscribes to changes on every record and tomysetas
more records are added in the future.myset.map().once(cb): gets each record once, including ones that are added
over time.myset.once().map().on(cb): gets the record list once, but subscribes to
changes on each of thosemyset, but not the records added later.myset.once().map().once(cb): gets the record list once, gets each record in
mysetonly once, and not the ones added later.
Conclusion
GunDB is changing the way that we think about databases and is slowly
transitioning us to a new paradigm. Gun, and its related projects, have a lot of
aspects that are very different from the classical centralized models. You may
find it challenging to learn Gun if you are just getting started. Firstly,
because Gun is a young project and you should expect the APIs to change. And
secondly, you may find it difficult to wrap your head around the documentation.
I'm hoping that these series of articles can help you (and me) to understand
GunDB better and serve as complementary guides to the pre-existing ones. You can
access all the official documentations and guides at
https://gun.eco/docs
Appendix 1
The easiest and the most consistent way of installing Node is through a version
manager like NVM. First, install NVM using
the following:
curl -o- https://raw.githubusercontent.com/creationix/nvm/v0.33.11/install.sh | bash
Then check your "profile" file to see if the following entries have been added:
export NVM_DIR="$HOME/.nvm"
[ -s "$NVM_DIR/nvm.sh" ] && \. "$NVM_DIR/nvm.sh"  # This loads nvm
[ -s "$NVM_DIR/bash_completion" ] && \. "$NVM_DIR/bash_completion"  # This loads nvm bash_completion
Then restart your terminal and make sure that you can get an output for nvm --version. After that simply run nvm install 8 to install the latest Node 8.
Afterwards, run node -v and npm -v to verify that both Node and Npm are
available.
